Rough‑in to Finish – A Realistic Timeline for a 3‑Bath Full Gut
Week‑by‑week map showing plumbing rough‑in, electrical, insulation, drywall, tile, trim, paint. What phase took you longer than you expected?
You’ve signed the contract, you’ve picked out tile samples, and you’ve braced yourself for dust. But now the real question hits: how long is this actually going to take?
Three bathrooms, gutted to the studs. Not a powder room refresh. Not a new vanity and mirror. Full demolition – old tile, cast‑iron tubs, rotten subfloor, corroded pipes, and wiring that looks like it was installed in the 1970s. You want everything new: plumbing, electrical, insulation, drywall, waterproofing, tile, trim, paint, and all the fixtures.
If you ask a general contractor for a timeline, you’ll likely hear “eight to ten weeks.” If you ask a tile setter, he’ll say “maybe twelve.” If you ask anyone who has actually done this before, they’ll smile and say “add 30%.”
So let’s cut through the optimism and build a realistic, week‑by‑week map – not the glossy schedule from a sales pitch, but the one that accounts for inspections, drying times, backorders, and the inevitable “surprises” behind the walls. This is based on a typical 3‑bathroom gut renovation in a single‑family home, assuming a competent crew and no major structural changes. If you have structural beams, moving walls, or complex plumbing reroutes, add a couple of weeks to almost every phase.
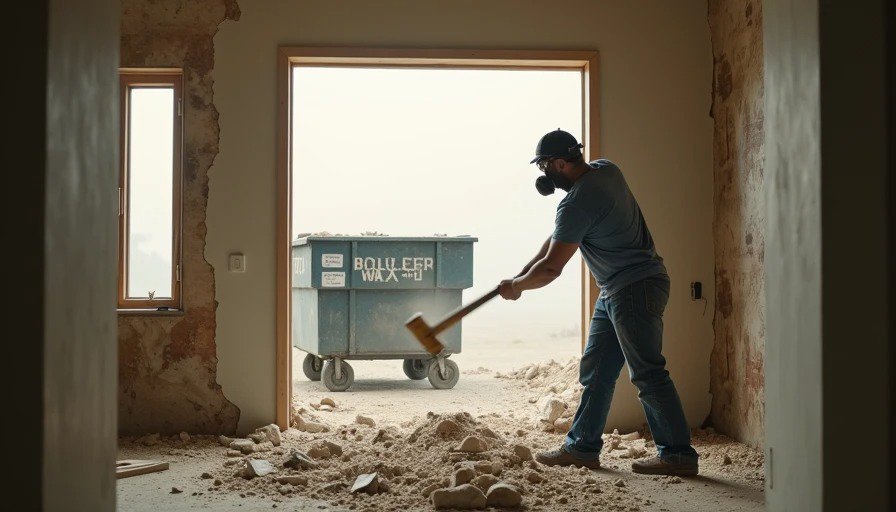
Week 1 – Demo and Dumpster
The first week is loud, dusty, and strangely satisfying. The crew comes in with sledgehammers, crowbars, and a dumpster parked in your driveway. They tear out everything: old tile, backer board, drywall, cabinets, vanities, toilets, bathtubs, shower pans, and flooring. They also disconnect plumbing fixtures and cap off lines temporarily.
What actually happens:
All three bathrooms are stripped to the studs and subfloor.
Old electrical boxes and wiring are exposed.
Plumbers and electricians do a walk‑through to mark where new rough‑ins will go.
Unexpected finds: water damage, mold, or termite‑eaten studs. If any of those appear, week 1 extends into week 2 while framing repairs happen.
Reality check: Demo usually finishes in 3–4 days for three bathrooms, but the dumpster fills faster than you think. Order a second one if you have a lot of cast iron or concrete. Also, prepare for dust – it will travel to every corner of your house, even with plastic barriers.
Week 2 – Rough Plumbing and Electrical, Part 1
Now the real work begins. Plumbers run new supply lines (hot and cold) and drainage pipes. Electricians pull new Romex for dedicated circuits, GFCI outlets, vanity lighting, exhaust fans, and maybe heated floors if you’ve planned for them.
Key milestones:
All drain, waste, and vent (DWV) pipes are roughed in for showers, tubs, and toilets.
Water supply stub‑outs are placed for shower valves, tub fillers, and sinks.
Electrical boxes for switches, outlets, and lights are positioned.
If you’re doing a curbless shower or linear drain, the plumber will set the rough‑in height carefully – this is critical.
The catch: If your house has old galvanized or cast‑iron pipes, the plumber may need to replace more than anticipated. That can add a day or two. Also, if you change your mind about where the shower head goes or where the vanity light hangs, now is the time to speak up – once drywall goes up, changes become expensive.
Week 3 – Rough Plumbing and Electrical, Part 2 + HVAC
This week wraps up the rough‑in work. Any remaining plumbing lines are secured, and the electrician finishes running wires for all three bathrooms. If you have an HVAC vent relocation, the ductwork is adjusted.
Inspections: Many municipalities require a rough‑in inspection for plumbing and electrical before you can close up the walls. The inspector comes, checks everything, and hopefully signs off. If they find a problem – say, a vent pipe not sloped correctly or a wire not properly stapled – you’ll lose a couple of days for the fix and re‑inspection.
Pro tip: Schedule your inspection well in advance. In busy seasons, inspectors can be a week out. Ask your GC to book it as soon as the rough‑in is about 80% complete.
Week 4 – Insulation and Vapor Barrier
With the rough‑ins approved, it’s time to stuff the walls. For bathroom exteriors, insulation is a must – not just for energy, but for sound. You don’t want to hear the toilet flush from the guest room.
What goes in:
Fiberglass or rockwool batts in exterior walls and between bathrooms (to reduce noise).
Vapor barrier (plastic sheeting) on exterior walls if required by your climate.
Insulation around plumbing pipes in unheated spaces to prevent freezing.
This is a relatively fast phase – typically two to three days for three bathrooms. But if you have complex framing with lots of pipes and wires, the insulating crew has to cut around everything, which slows them down.
Week 5 – Drywall Hanging and Taping
The walls close up. Drywall crews love this phase because it transforms the chaos into something that looks like a room again. They hang 1/2‑inch or 5/8‑inch moisture‑resistant drywall (green board or purple board) in bathrooms.
Week 5 tasks:
Hang all ceiling and wall drywall, including cement board or waterproof backer board in shower and tub areas (often done by tile setters, not drywallers).
Tape and mud the joints – first coat, then second coat the next day, and sanding.
The reality: For three bathrooms, hanging takes 2 days, but taping and mudding require multiple coats with drying time between each. By the end of week 5, you’ll have sanded walls but they won’t be completely smooth – a final skim coat may push into week 6.
Watch out: If the drywall crew finds bowed studs or uneven framing, they’ll have to shim or plane the wood, adding half a day per bathroom.
Week 6 – Drywall Finish, Primer, and Start Tile Prep
This is a transitional week. The drywallers do their final sanding, and then the primer goes on – typically a drywall primer that seals the paper and dust. While the primer dries, the tile setter arrives to start waterproofing shower walls and floors.
Waterproofing: For tiled showers, the walls get a liquid membrane (like RedGard) or a sheet membrane (like Kerdi). This needs to cure for at least 24 hours before you can tile.
Tile layout: The tile setter will snap chalk lines and plan the layout, especially for large‑format tiles or herringbone patterns. This takes time – expect a full day just for layout and cutting preparations.
If you have three bathrooms, tiling is spread out: You might start tiling one shower this week while the others are still being waterproofed.
Week 7 – Tile Installation (Showers, Floors, and Backsplashes)

Now the real marathon begins. Tiling is often the longest single phase of a bathroom renovation, especially if you have large tiles, complex patterns, or intricate mosaics.
Typical timeline for three bathrooms:
Shower walls (including niche) – 2 to 3 days per bathroom, depending on size and tile size.
Shower floors – 1 day per bathroom (includes slope and drain).
Bathroom floors – 1 day per bathroom.
If you have a tub surround, that’s another 1–2 days.
Grouting – 1 day per bathroom after the tile has cured (typically 24–48 hours).
So for three full bathrooms, you’re looking at 5 to 7 working days just for tile installation, spread over week 7 and into week 8. That’s assuming no complications. Add more if you have custom cuts around windows, pipes, or sloped ceilings.
The trap: Tile delivery delays, especially if you ordered handmade or imported tile. Also, the tile setter might have other jobs – good ones are busy. If they leave your site to go to another job, your timeline stretches.
Week 8 – Grouting, Curing, and Start of Trim Carpentry
By mid‑week, most tile is grouted and left to cure. Grout needs 72 hours before it can get wet – so no showers yet. While the grout cures, the trim carpenters begin installing window and door casings, baseboards, and any built‑in shelves or niches.
Trim work: For three bathrooms, this might take 2–3 days. They’ll cope corners, nail everything in place, and fill nail holes. If you have custom millwork or complex angles, add more time.
Simultaneously: The painter may start priming the drywall areas that aren’t tiled – walls above the tile, ceilings, and trim.
Week 9 – Painting (First Coat)
The painter returns for the main paint coats. Bathrooms usually require semi‑gloss or satin sheen for moisture resistance. They’ll paint all walls, ceilings, and trim – two coats.
Three bathrooms: A good painter can do one bathroom per day, so three days for the first coat, then a day for the second coat. But they also have to cut in around tile, which is meticulous. Expect week 9 to be mostly painting, with drying time in between.
Week 10 – Fixture Installation (Vanities, Toilets, Mirrors, Lighting)
Now things come together. Plumbers return to install toilets, faucets, shower heads, shower valves, and any bathtub fixtures. Electricians install vanity lights, exhaust fans, and any heated floor thermostats. The tile setters may come back to install shower glass doors or grab bars if they’re doing that.
Timeline: For three bathrooms, this takes 2–3 days, but there’s a lot of coordination. If a fixture is backordered or damaged, the plumber might leave and come back later – which causes delays.
Pro tip: Open every box the day before installation to check for damage. Nothing stops a project faster than a cracked sink or a missing shower valve trim kit.
Week 11 – Finishing Touches (Caulking, Hardware, Mirror, Shelving)
This week is all about the details. The GC or a handyman will caulk around shower bases, vanities, and tub surrounds. They’ll install towel bars, toilet paper holders, robe hooks, and any mirrors that aren’t built‑in. They’ll also touch up paint, install door stops, and do a final clean.
Three bathrooms: This could take 2–3 days, but it’s often spread out because the GC has to wait for the caulk to dry before cleaning.
Week 12 – Final Inspection and Punch List
The final walk‑through with your GC. Check every tile for lippage, every outlet for function, every faucet for leaks. Create a punch list of small items – maybe a loose drawer, a missing escutcheon plate, or a paint scuff. The GC will allocate a day or two to fix those.
And then… you’re done. In theory. But in reality, most projects stretch beyond 12 weeks.
The Realistic Average: 14–16 Weeks for Three Bathrooms
Why the extra time? Because everything takes longer than planned:
Inspections – waiting for the building official adds days.
Drying times – mortar, grout, paint, and caulk all need curing.
Material delays – a niche shelf, a glass panel, or a custom vanity arrives late.
Trade coordination – the tile setter and the electrician and the plumber all need to work in sequence, and their schedules rarely align perfectly.
Unforeseen discoveries – rotted framing, old galvanized pipes, or insufficient electrical service often add a week.
So if your GC says 12 weeks, mentally prepare for 14. If they say 10, plan for 13. It’s not pessimism – it’s the reality of working with old houses and human schedules.
What Phase Took You Longer Than You Expected?
Now it’s your turn to chime in. Every renovation has that one phase that overstays its welcome.
Was it tile – because the pattern was intricate or the tile was harder to cut than expected? Was it rough‑in plumbing – because the plumber discovered a dozen hidden surprises behind the walls? Was it drywall – because the sanding had to be perfect for the high‑gloss paint you chose? Or was it the trim – because the carpenters had to custom‑fit every piece around out‑of‑square walls?
Maybe it was the waiting – for the inspector, for the glass company, for the backordered vanity lights.
I’ll share mine: In my own three‑bath gut, the tile phase blew past the schedule by nearly two weeks. We had picked a beautiful large‑format porcelain (24×48 inches) for the floors, but the substrate wasn’t perfectly flat. The tile setter had to do a self‑leveling pour, wait for it to cure, then lay the tile – and because the tiles were so large, the mortar had to be applied with a special notched trowel, and we had to wait for each row to set before walking on it. Then the grout – a light colour that showed every imperfection – required multiple cleanings. By the time we finished, we were two weeks behind on everything else.
I’ve also heard horror stories about electrical rough‑in when the homeowner wanted heated floors and towel warmers and multiple sconces, and the electrician had to upgrade the panel and run new home runs – a full week of extra work.
So, what’s the phase that made you pull your hair out? Was it the waiting for the plumber to show up? The endless sanding of drywall? The two weeks of rain that delayed the painter because he wouldn’t paint when humidity was high?