
A wiring diagram for a two-way switch is a planning document, not a substitute for electrical training. In US terminology, a two-way switching arrangement usually means one light controlled from two locations, such as a hallway switch at each end or a stair light controlled from the bottom and top landings. In some regions, the same setup is called a three-way switch circuit. Before anyone opens a box, identify the local terminology, confirm the circuit voltage, and put the electrical scope on the renovation schedule.
The practical value is coordination. A homeowner acting as project manager needs to know where the switches, light fixture, cable routes, junction boxes, and access points will be before drywall, insulation, cabinets, or trim make changes expensive. If it's not on the schedule, it's not happening.
What the diagram should show
Start with a simple floor-plan sketch rather than copying a random internet image. Mark the power source, the light fixture, both switch boxes, and the route between them. Then label every cable by its purpose. A typical two-location lighting circuit includes a line conductor bringing power into the circuit, a load conductor carrying power to the fixture, and traveler conductors connecting the two switches. Grounding conductors also need to be shown.
The exact arrangement depends on where power enters. Power might arrive at the first switch, at the light box, or at a junction box. Those three layouts can look similar in a finished room but require different cable routing and box connections. A useful wiring diagram for a two-way switch should therefore identify the source location instead of assuming the feed enters the first switch.
Draw the circuit with plain labels such as line, load, neutral, traveler, and ground. Do not rely on color alone. Older homes can contain nonstandard colors, repurposed conductors, or insulation damaged by heat and moisture. Photograph the existing installation before disassembly, but treat the photograph as documentation, not proof that the old work was correct.
Build the electrical sequence into the renovation schedule
The electrical rough-in should happen after framing changes are stable and before insulation or drywall. Put these checkpoints on the project calendar:
- Confirm the switch locations against the final floor plan and door swings.
- Have the electrician verify the circuit route, box depth, cable type, and breaker capacity.
- Install and secure boxes before rough-in inspection.
- Complete cable routing, stapling, grounding, and labeling.
- Photograph open walls and record which breaker supplies the circuit.
- Schedule the required inspection before insulation covers the work.
- Close the walls only after corrections are complete and approved.
This sequence prevents a common renovation failure: the trim carpenter installs casing, then discovers that a switch box is too close to the door opening. Moving that box after drywall can consume half a day and create a patching bill of $150 to $400, depending on access and finish work. A five-minute plan review at framing stage is cheaper than a late change order.
Include material arrival in the schedule. Standard switch boxes, cable, connectors, and basic switches are usually easy for an electrician to source, but specialty dimmers, smart switches, matching wall plates, and commercial-grade devices can take several days or longer. Do not close walls while waiting for a device that requires a different neutral configuration.
How to read the circuit without guessing
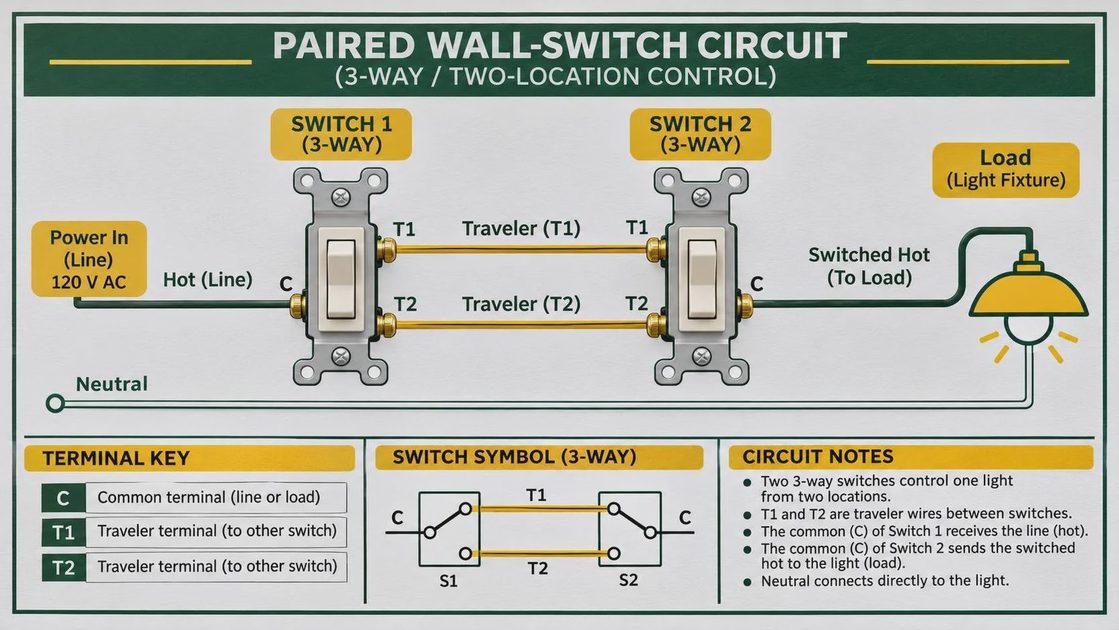
The two switches in this arrangement do not operate like two independent single-pole switches. Each switch changes the path between the common terminal and one of two traveler terminals. The common terminal is often a different color from the traveler terminals, but terminal colors and device layouts still need to be checked against the manufacturer instructions.
A wiring diagram for a two-way switch should make the common terminals obvious. One common normally connects to the incoming line or the switched leg, depending on the circuit layout. The traveler terminals connect between the two switches. The neutral generally continues to the light fixture rather than connecting to a traditional mechanical switch, although modern smart controls can require a neutral at the switch box.
That last point matters during a renovation. If the homeowner wants a smart switch later, tell the electrician before rough-in. A switch box with no neutral may work for a basic mechanical control but limit future device choices. Adding a neutral after drywall is not a small cosmetic adjustment; it can require opening walls or rerouting cable.
Never use a voltage tester as permission to touch a conductor. Turn off the breaker, lock or label it where practical, verify de-energization with an appropriate tester, and follow local electrical requirements. If the circuit is aluminum-wired, damaged, unusually crowded, or part of an older ungrounded system, stop the DIY portion and bring in a licensed electrician.
Common coordination failures and their costs
The first failure is placing both switches on the wrong side of a doorway. The diagram may be electrically correct while the room remains frustrating to use. Mark the handle side, furniture locations, stair direction, and expected walking path before box placement. A switch hidden behind an open door is a layout error, not an electrical mystery.
The second failure is ordering the fixture too late. The electrician needs to know whether the light is a flush mount, pendant, fan-rated fixture, or heavy chandelier. A ceiling fan box can require different support from a lightweight fixture box. If the final fixture weighs 25 pounds but the installed box was selected for a basic light, the correction can involve framing access and inspection delays.
The third failure is missing the wall-plate plan. Two switches beside a wide trim profile may need a two-gang box, while a dimmer and smart control may require extra box volume. A crowded box can create heat and installation problems. Record the final device count, plate size, and box depth before ordering finish materials.
A realistic budget separates rough and finish work. For a straightforward two-location light circuit, labor and materials can commonly land around $200 to $600 when walls are open, while difficult access, attic work, plaster repair, or permit-driven upgrades can push the total higher. The point is not to predict a universal price; it is to reserve money for access and correction work instead of spending the entire electrical allowance on fixtures.
Closeout checklist for the project manager
Before insulation, compare the installed work with the wiring diagram for a two-way switch and record any field changes. The electrician should identify the breaker, confirm the light operates from both locations, verify grounding, and test any dimmer or smart control with its intended load. Keep the device instructions, permit paperwork, inspection notes, and wall photographs in one project folder.
At final walkthrough, test the circuit from both switch positions several times. Check that the switch plates sit flat, screws are not over-tightened, boxes are not loose, and the light does not flicker. Confirm that the breaker label is accurate. If a replacement switch is planned, photograph the box and note whether a neutral is present before buying the device.
The best wiring diagram for a two-way switch is the one that supports decisions before work starts: where the cable runs, when the inspection happens, which trade needs access, and what changes would force rework. Put those decisions beside the framing, insulation, drywall, and trim dates. Then ask the electrician to review the plan before materials are ordered, not after the wall is closed. What does your current renovation schedule show for the electrical rough-in, inspection, and fixture delivery?


